WSO2 API Manager — Switch from Resident Key Manager to ForgeRock

Hello Geeks!!! 😊😊😊
Today, I’ll explain how to switch OAuth clients from the Resident Key Manager to the ForgeRock 7.1.0 key manager in the API Manager 4.0.0.
As you know, WSO2 API Manager is the world’s leading open-source, enterprise-grade API management platform for on-premises, cloud, and hybrid architectures.
WSO2 API Manager 4.0.0 supports multiple key manager types such as WSO2 Identity Server, KeyCloak, ForgeRock, OKTA, PingFederate, Auth0, etc… to configure with the API Manager as an external key manager.
Let’s understand the use case that we are trying to achieve today. 😇😇😇
Let’s assume that you have created applications through the dev portal and generated access tokens by using the Resident Key Manager. In this case, all the service providers of those applications got created on the Resident Key Manager side and, now you are trying to use ForgeRock Key Manager with the API Manager 4.0.0 and need to move all the service providers (OAuth2 clients) to the ForgeRock server with the same client credentials without creating different client credentials.
So, how to achieve this? 🤔🤔🤔
OK. Let’s do it like a BOSS!!! 😎😎😎
For the demonstration purpose, We have selected the ForgeRock Key Manager 7.1.0 version, the apache-tomcat-9.0.52 server version to deploy the ForgeRock WAR file, and the API Manager 4.0.0 update level 42 pack. (You can use the API Manager 4.0.0 updated versions by taking updates using the Update 2.0 tool [1])
- Start the Tomcat server.
- Go to the Tomcat Web Application Manager section and select the Forgerock OpenAM Services WAR file and deploy.
- After deploying, go to the ForgeRock context path and (In this case, I have used http://localhost:8080/forgerock) follow the documentation [2] to configure the ForgeRock connector with the API Manager 4.0.0. (When assigning default scopes to the Oauth client which is used to configure with the API Manager, please use am-introspect-all-tokens-any-realm scope instead of am-introspect-all-tokens scope because the am-introspect-all-tokens-any-realm scope has been introduced in ForgeRock 7.x.x versions.)
Now we have configured the ForgeRock key manager as an external key manager to the API Manager 4.0.0. Let’s create an application.
- Go to the dev portal of the API Manager.
- Create a new application. (TEST_APP)
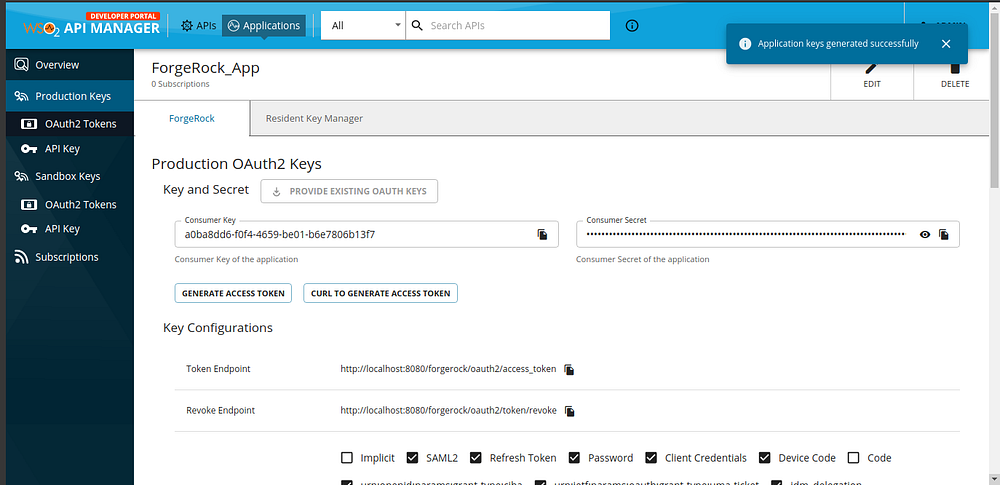
- Under the Production Keys or Sandbox Keys section, we will be able to see both Resident Key Manager and the ForgeRock key manager tabs as below image.

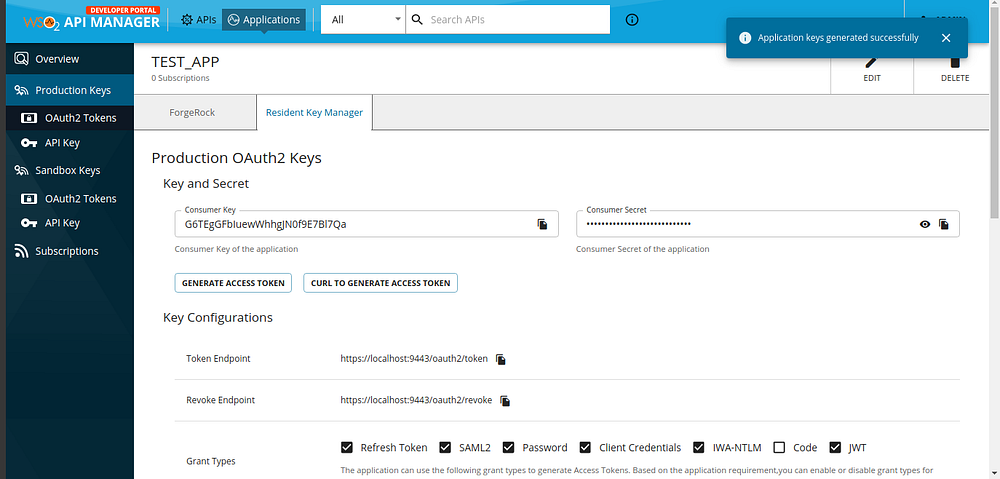
- Select the Resident Key Manager and generate application keys by clicking on the GENERATE KEYS button.
- After generating application keys, we will be able to see client credential details generated from the Resident Key Manager as below image.
Now we have generated application keys for the created application and that means, we have created a service provider by using the Resident Key Manager. Let’s move the application to the ForgeRock key manager. 😎😎😎
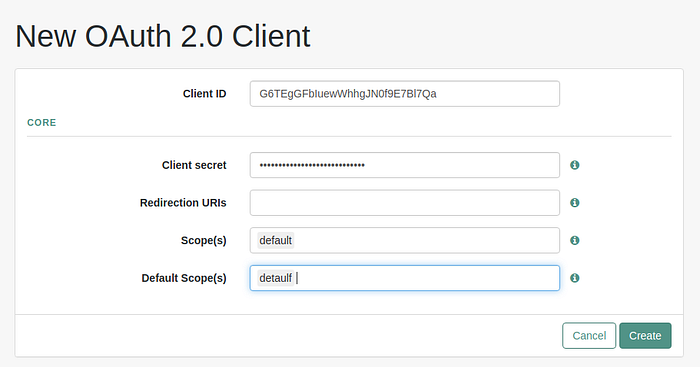
- Go to the ForgeRock Key Manager server and select Applications -> OAuth 2.0 -> Clients under the Top Level Realm.
- Create an OAuth 2.0 client by parsing the client ID and client secret generated by the Resident Key Manager (We have to parse default as the Scope and default as the Default Scope when creating the OAuth 2.0 client).
- After creating the OAuth 2.0 client, Under the Core section, we need to add the Client Name in the below format and click on the Save Changes button.
en|<PROVIDER_NAME><APPLICATIONNAME>_<ENVIRONMENT>
Eg: en|adminTEST_APP_PRODUCTION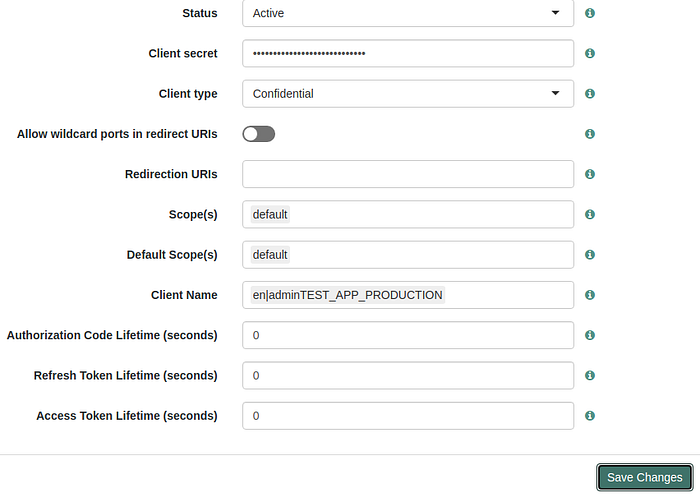
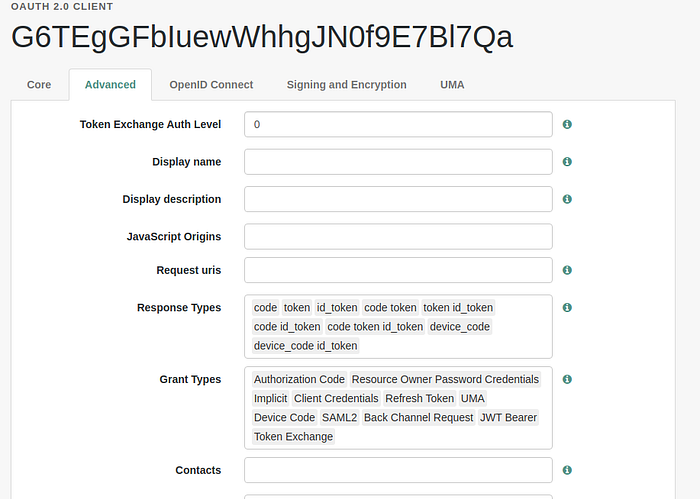
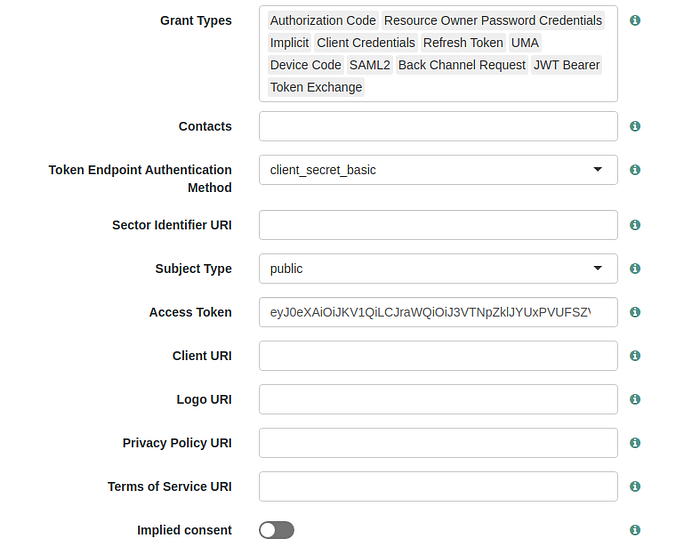
- Go to the Advanced section of the created OAuth 2.0 client and add Grant Types (When adding grant types and load the application via the dev portal, that will tick grant types from the list.)
- When loading the application through the dev portal, the dev portal will initiate a GET request through the Dynamic Client Registration (DCR) endpoint of the ForgeRock Key Manager to retrieve client information by parsing the client ID as a query parameter. To get client details from the ForgeRock key manager, we need to parse the registration access token of that client and this is mandatory.
- Therefore, we have to provide a valid Access Token in this section to retrieve application info from the ForgeRock server via the dev portal. Hence, please invoke the token endpoint of the ForgeRock server by parsing the client_credentials grant type with the client details(That we need to provide when configuring the ForgeRock key manager via the admin portal) and generate an access token.
curl --location --request POST 'http://localhost:8080/forgerock/oauth2/access_token' --header 'Authorization: Basic YWRtaW46YWRtaW4=' --header 'Content-Type: application/x-www-form-urlencoded' --data-urlencode 'grant_type=client_credentials'{"access_token":"eyJ0eXAiOiJKV1QiLCJraWQiOiJ3VTNpZklJYUxPVUFSZVJCL0ZHNmVNMVAxUU09IiwiYWxnIjoiUlMyNTYifQ.eyJzdWIiOiIoYWdlIWFkbWluKSIsImN0cyI6Ik9BVVRIMl9TVEFURUxFU1NfR1JBTlQiLCJhdWRpdFRyYWNraW5nSWQiOiJmMzgwZGVmZC1iYTZmLTQ4MmQtYTgyOC04OWUxYzgxMGYxMGItMzA0MDIiLCJzdWJuYW1lIjoiYWRtaW4iLCJpc3MiOiJodHRwOi8vbG9jYWxob3N0OjgwODAvZm9yZ2Vyb2NrL29hdXRoMiIsInRva2VuTmFtZSI6ImFjY2Vzc190b2tlbiIsInRva2VuX3R5cGUiOiJCZWFyZXIiLCJhdXRoR3JhbnRJZCI6InVpSjR5Q3plUnZUSW9sY0VvYi1WT0hlUC1sRSIsImF1ZCI6ImFkbWluIiwibmJmIjoxNjM0OTgwNzA4LCJncmFudF90eXBlIjoiY2xpZW50X2NyZWRlbnRpYWxzIiwic2NvcGUiOlsiYW0taW50cm9zcGVjdC1hbGwtdG9rZW5zLWFueS1yZWFsbSIsImR5bmFtaWNfY2xpZW50X3JlZ2lzdHJhdGlvbiJdLCJhdXRoX3RpbWUiOjE2MzQ5ODA3MDgsInJlYWxtIjoiLyIsImV4cCI6MTYzNDk4NDMwOCwiaWF0IjoxNjM0OTgwNzA4LCJleHBpcmVzX2luIjozNjAwLCJqdGkiOiJ3djFFallncERVbjllck1MM2diUkJyb25KSDgifQ.mNILJHc3JY_eK7Pe1sXrR4BXld0snYrUGFq2LgOEmqPsVjGutdLRXS2F8iKE1JY2chbTSmZNdGMMmbHM7qTBXv34a_XBlTBsZQpzCCGa-wBiHxVLLKNEIMwbYSamKMovLDXyccz29xPVzKKAVNjI1wcVTKdhsCcEmd-UtLYzTfianMLY8fyYjPVTs1AtvyJ7J6eEhlKk1GzVg9y37JQBRsNegpbRoZd7WPcfMtNWo-nvb0zL4Go4yAdw6oyPtqIwY6bGF3mP9x_deVB9cwvA3__owfiEgoYUKwW_-p6vzeMChT2oB4Br2Fk2sbZ16Ztqabvh89YK5AWvQ1pBTnUL0A","scope":"dynamic_client_registration am-introspect-all-tokens-any-realm","token_type":"Bearer","expires_in":3599}
- Then we need to provide the generated access token under the Access Token section of the OAuth 2.0 client as below image and click on the Save Changes button.
Now we have created the OAuth 2.0 client in the ForgeRock key manager with the client credentials details issued from the Resident Key Manager. Let’s switch the key manager from Resident Key Manager to the ForgeRock Key Manager of this application. For this, we need database access.
- If you are using the default H2 databases with the API Manager 4.0.0, you can simply add the below configuration to the deployment.toml file inside the <APIM_HOME>/repository/conf directory and restart the server. (Please refer to the documentation [3] for more information about the H2 database browsing configurations.)
[database_configuration]
enable_h2_console = "true"- After restarting the API Manager server, go to the below URL to access the H2 console.
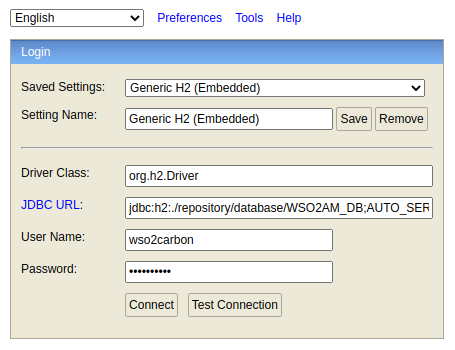
Since we are trying to switch applications, we need to access APIM_DB. (which is configured under the [database.apim_db] in the deployment.toml file.)
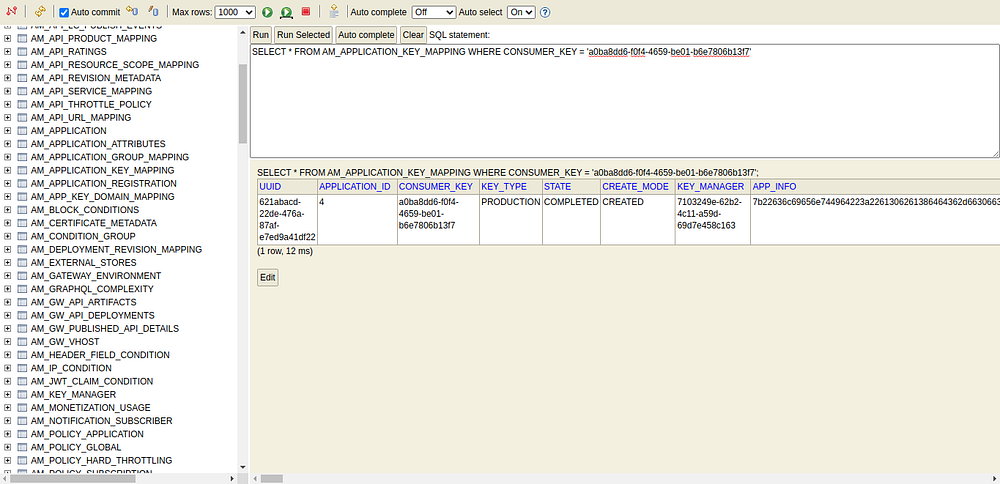
- After accessing the APIM database, we can simply run the below query to retrieve the application details from the AM_APPLICATION_KEY_MAPPING table.
SELECT * FROM AM_APPLICATION_KEY_MAPPING WHERE CONSUMER_KEY = 'CLIENT_ID'Eg: SELECT * FROM AM_APPLICATION_KEY_MAPPING WHERE CONSUMER_KEY = 'G6TEgGFbIuewWhhgJN0f9E7Bl7Qa'
- The above query will show a similar result as the below image.
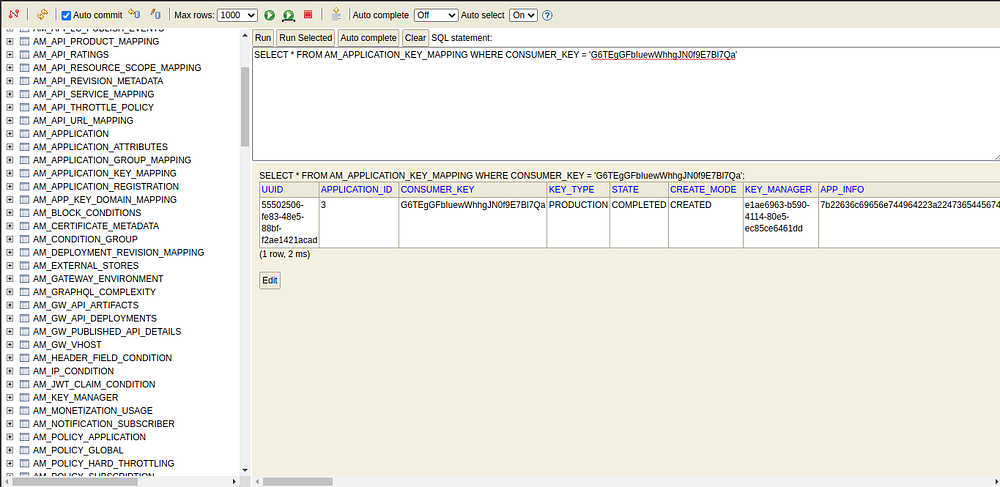
This is the table record that we need to modify to achieve our ultimate goal. For that,
- We need to modify the APP_INFO column which has the DCR response of the application in BLOB format.
- We need to modify the KEY_MANAGER column by parsing the UUID of the ForgeRock key manager. I will explain the steps to get the UUID of the key manager later.😇😇😇
Modify the APP_INFO column
This is the place that has the DCR response of the key manager. we need to modify this response that matches with the DCR response of the ForgeRock Key Manager. For that, first, we need to get the format of the DCR response issued from the ForgeRock Key Manager.
- Go to the dev portal.
- Create an application.
- Click on the GENERATE KEYS button after selecting the ForgeRock tab to generate application keys by using the Forgerock key manager. In this step, the API Manager will add a record to the AM_APPLICATION_KEY_MAPPING table with the response of the client registration event.
- Execute the below query under the APIM database to retrieve the newly created application record details.
SELECT * FROM AM_APPLICATION_KEY_MAPPING WHERE CONSUMER_KEY = 'CLIENT_ID'Eg: SELECT * FROM AM_APPLICATION_KEY_MAPPING WHERE CONSUMER_KEY = 'a0ba8dd6-f0f4-4659-be01-b6e7806b13f7'
- Now, let’s copy the content shown in the APP_INFO column of the above record to take the DCR response format of the ForgeRock Key Manager.
- Go to a website to convert the copied content from Hex to String. For that, we have used the website [4]. After converting the APP_INFO content from Hex to String, we will be able to see the DCR response format as below image.
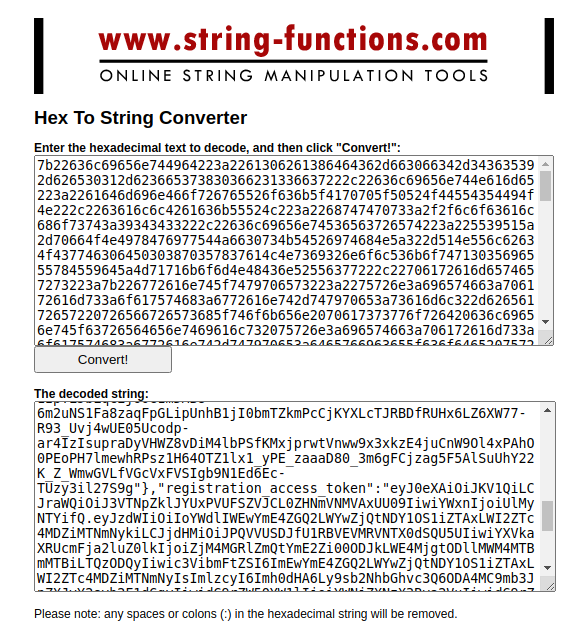
- Let’s copy the DCR response format to customize and the format is similar to the below.
We need to customize the below tag names mentioned in the above response format.
- <CLIENT_ID> — We have to parse the client ID of the manually created Oauth 2.0 client. (In our case, the client ID is G6TEgGFbIuewWhhgJN0f9E7Bl7Qa)
- <CLIENT_NAME> — We have to parse the client name of the manually created Oauth 2.0 client in the Forgerock key manager side. (In our case, the value should be adminTEST_APP_PRODUCTION)
- <CLIENT_SECRET> — We have to parse the client secret of the manually created Oauth 2.0 client in the Forgerock key manager side.
- <REGISTRATION_ACCESS_TOKEN> — We have to parse the registration access token of the manually created Oauth 2.0 client. (We have generated the access token by invoking the token endpoint of the ForgeRock Key Manager and added it to the created OAuth 2.0 client.)
When configuring the value of the registration_client_uri key in the above JSON, we have to configure the URL as below.
"registration_client_uri": "http://localhost:8080/forgerock/oauth2/register?client_id\u003d<CLIENT_ID>",Eg: "registration_client_uri": "http://localhost:8080/forgerock/oauth2/register?client_id\u003dG6TEgGFbIuewWhhgJN0f9E7Bl7Qa",
- After creating the JSON payload, we can simply convert that content into Hex encoded format. Before that, we need to remove whitespace, escape characters.
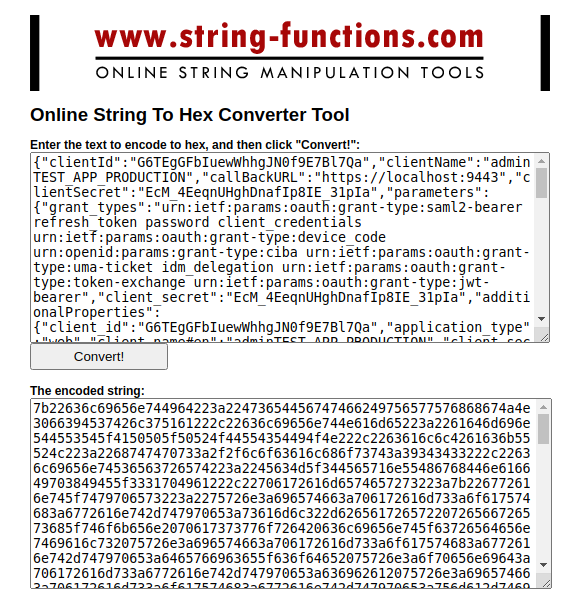
- Copy the Hex content generated from the link [5].
- Now, we need to go to the APIM_DB and execute the below command to update the APP_INFO column of the table record that we need to customize inside the AM_APPLICATION_KEY_MAPPING table.
UPDATE AM_APPLICATION_KEY_MAPPING SET APP_INFO = 'HEX_CONTENT' WHERE CONSUMER_KEY = 'CLIENT_ID'Eg: UPDATE AM_APPLICATION_KEY_MAPPING SET APP_INFO = '7b22636c69656e744964223a22473654456747466249756577576868674a4e3066394537426c375161222c22636c69656e744e616d65223a2261646d696e544553545f4150505f50524f44554354494f4e222c2263616c6c4261636b55524c223a2268747470733a2f2f6c6f63616c686f73743a39343433222c22636c69656e74536563726574223a2245634d5f344565716e55486768446e616649703849455f3331704961222c22706172616d6574657273223a7b226772616e745f7479706573223a2275726e3a696574663a706172616d733a6f617574683a6772616e742d747970653a73616d6c322d62656172657220726566726573685f746f6b656e2070617373776f726420636c69656e745f63726564656e7469616c732075726e3a696574663a706172616d733a6f617574683a6772616e742d747970653a6465766963655f636f64652075726e3a6f70656e69643a706172616d733a6772616e742d747970653a636962612075726e3a696574663a706172616d733a6f617574683a6772616e742d747970653a756d612d7469636b65742069646d5f64656c65676174696f6e2075726e3a696574663a706172616d733a6f617574683a6772616e742d747970653a746f6b656e2d65786368616e67652075726e3a696574663a706172616d733a6f617574683a6772616e742d747970653a6a77742d626561726572222c22636c69656e745f736563726574223a2245634d5f344565716e55486768446e616649703849455f3331704961222c226164646974696f6e616c50726f70657274696573223a7b22636c69656e745f6964223a22473654456747466249756577576868674a4e3066394537426c375161222c226170706c69636174696f6e5f74797065223a22776562222c22636c69656e745f6e616d6523656e223a2261646d696e544553545f4150505f50524f44554354494f4e222c22636c69656e745f736563726574223a2245634d5f344565716e55486768446e616649703849455f3331704961222c22636c69656e745f74797065223a22436f6e666964656e7469616c222c22636c69656e745f7365637265745f657870697265735f6174223a302e302c226163636573735f746f6b656e5f6c69666574696d65223a302e302c22726566726573685f746f6b656e5f6c69666574696d65223a302e302c22617574686f72697a6174696f6e5f636f64655f6c69666574696d65223a302e302c2272656469726563745f75726973223a5b2268747470733a2f2f6c6f63616c686f73743a39343433225d2c2264656661756c745f73636f706573223a5b2264656661756c74225d2c22726567697374726174696f6e5f636c69656e745f757269223a22687474703a2f2f6c6f63616c686f73743a383038302f666f726765726f636b2f6f61757468322f72656769737465723f636c69656e745f69645c7530303364473654456747466249756577576868674a4e3066394537426c375161222c22726573706f6e73655f7479706573223a5b5d2c22746f6b656e5f656e64706f696e745f617574685f6d6574686f64223a22636c69656e745f7365637265745f6261736963222c22726571756573745f6f626a6563745f7369676e696e675f616c67223a22222c226772616e745f7479706573223a5b2275726e3a696574663a706172616d733a6f617574683a6772616e742d747970653a73616d6c322d626561726572222c22726566726573685f746f6b656e222c2270617373776f7264222c22636c69656e745f63726564656e7469616c73222c2275726e3a696574663a706172616d733a6f617574683a6772616e742d747970653a6465766963655f636f6465222c2275726e3a6f70656e69643a706172616d733a6772616e742d747970653a63696261222c2275726e3a696574663a706172616d733a6f617574683a6772616e742d747970653a756d612d7469636b6574222c2269646d5f64656c65676174696f6e222c2275726e3a696574663a706172616d733a6f617574683a6772616e742d747970653a746f6b656e2d65786368616e6765222c2275726e3a696574663a706172616d733a6f617574683a6772616e742d747970653a6a77742d626561726572225d2c22726567697374726174696f6e5f6163636573735f746f6b656e223a2265794a30655841694f694a4b563151694c434a72615751694f694a3356544e705a6b6c4a59557850565546535a564a434c305a484e6d564e4d56417855553039496977695957786e496a6f69556c4d794e54596966512e65794a7a645749694f69496f5957646c4957466b62576c754b534973496d4e3063794936496b3942565652494d6c3954564546555255784655314e6652314a42546c51694c434a68645752706446527959574e726157356e535751694f694a6d4d7a67775a47566d5a43316959545a6d4c5451344d6d5174595467794f4330344f575578597a67784d4759784d4749744d7a41304d4449694c434a7a64574a755957316c496a6f6959575274615734694c434a7063334d694f694a6f644852774f6938766247396a5957786f62334e304f6a67774f4441765a6d39795a32567962324e724c3239686458526f4d694973496e527661325675546d46745a534936496d466a5932567a633139306232746c62694973496e52766132567558335235634755694f694a435a5746795a5849694c434a686458526f52334a68626e524a5a434936496e5670536a52355133706c556e5a555357397359305676596931575430686c5543317352534973496d46315a434936496d466b62576c7549697769626d4a6d496a6f784e6a4d304f5467774e7a41344c434a6e636d4675644639306558426c496a6f69593278705a57353058324e795a57526c626e52705957787a4969776963324e76634755694f6c73695957307461573530636d397a6347566a6443316862477774644739725a57357a4c574675655331795a57467362534973496d5235626d467461574e66593278705a57353058334a6c5a326c7a64484a6864476c7662694a644c434a686458526f58335270625755694f6a45324d7a51354f4441334d446773496e4a6c59577874496a6f694c794973496d5634634349364d54597a4e446b344e444d774f43776961574630496a6f784e6a4d304f5467774e7a41344c434a6c65484270636d567a58326c75496a6f7a4e6a41774c434a7164476b694f694a33646a4646616c6c6e63455256626a6c6c636b314d4d326469556b4a796232354b5344676966512e6d4e494c4a4863334a595f654b37506531735872523442586c6430736e597255474671324c674f456d715073566a477574644c525853324638694b45314a593263686254536d5a4e64474d4d6d62484d3771544258763334615f58426c5442735a51707a434347612d7742694878564c4c4b4e45494d77625953616d4b4d6f764c44587963637a32397850567a4b4b41564e6a4931776356544b6468734363456d642d55744c597a546669616e4d4c59386679596a5056547331417476794a374a366545686c4b6b31477a5667397933374a514252734e65677062526f5a6437575063664d744e576f2d6e7662307a4c34476f3479416477366f7950747149775936624746336d5039785f646556423963777641335f5f6f77666945676f59554b77575f2d7036767a654d436854326f4234427232466b3273625a31365a7471616276683839594b3541577651317042546e554c3041227d2c22726567697374726174696f6e5f6163636573735f746f6b656e223a2265794a30655841694f694a4b563151694c434a72615751694f694a3356544e705a6b6c4a59557850565546535a564a434c305a484e6d564e4d56417855553039496977695957786e496a6f69556c4d794e54596966512e65794a7a645749694f69496f5957646c4957466b62576c754b534973496d4e3063794936496b3942565652494d6c3954564546555255784655314e6652314a42546c51694c434a68645752706446527959574e726157356e535751694f694a6d4d7a67775a47566d5a43316959545a6d4c5451344d6d5174595467794f4330344f575578597a67784d4759784d4749744d7a41304d4449694c434a7a64574a755957316c496a6f6959575274615734694c434a7063334d694f694a6f644852774f6938766247396a5957786f62334e304f6a67774f4441765a6d39795a32567962324e724c3239686458526f4d694973496e527661325675546d46745a534936496d466a5932567a633139306232746c62694973496e52766132567558335235634755694f694a435a5746795a5849694c434a686458526f52334a68626e524a5a434936496e5670536a52355133706c556e5a555357397359305676596931575430686c5543317352534973496d46315a434936496d466b62576c7549697769626d4a6d496a6f784e6a4d304f5467774e7a41344c434a6e636d4675644639306558426c496a6f69593278705a57353058324e795a57526c626e52705957787a4969776963324e76634755694f6c73695957307461573530636d397a6347566a6443316862477774644739725a57357a4c574675655331795a57467362534973496d5235626d467461574e66593278705a57353058334a6c5a326c7a64484a6864476c7662694a644c434a686458526f58335270625755694f6a45324d7a51354f4441334d446773496e4a6c59577874496a6f694c794973496d5634634349364d54597a4e446b344e444d774f43776961574630496a6f784e6a4d304f5467774e7a41344c434a6c65484270636d567a58326c75496a6f7a4e6a41774c434a7164476b694f694a33646a4646616c6c6e63455256626a6c6c636b314d4d326469556b4a796232354b5344676966512e6d4e494c4a4863334a595f654b37506531735872523442586c6430736e597255474671324c674f456d715073566a477574644c525853324638694b45314a593263686254536d5a4e64474d4d6d62484d3771544258763334615f58426c5442735a51707a434347612d7742694878564c4c4b4e45494d77625953616d4b4d6f764c44587963637a32397850567a4b4b41564e6a4931776356544b6468734363456d642d55744c597a546669616e4d4c59386679596a5056547331417476794a374a366545686c4b6b31477a5667397933374a514252734e65677062526f5a6437575063664d744e576f2d6e7662307a4c34476f3479416477366f7950747149775936624746336d5039785f646556423963777641335f5f6f77666945676f59554b77575f2d7036767a654d436854326f4234427232466b3273625a31365a7471616276683839594b3541577651317042546e554c3041222c22636c69656e745f6e616d65223a2261646d696e544553545f4150505f50524f44554354494f4e222c22636c69656e745f6964223a22473654456747466249756577576868674a4e3066394537426c375161227d2c226973536161734170706c69636174696f6e223a66616c73652c2261707041747472696275746573223a7b7d7d' WHERE CONSUMER_KEY = 'G6TEgGFbIuewWhhgJN0f9E7Bl7Qa'
Modify the KEY_MANAGER column
- We need to update the KEY_MANAGER column in the same table record by parsing the UUID of the Key Manager to map with the ForgeRock Key Manager. For that, we need to find the UUID of the configured ForgeRock Key Manager.
- Execute the below command inside the APIM_DB to get all the details of configured key managers.
SELECT * FROM AM_KEY_MANAGER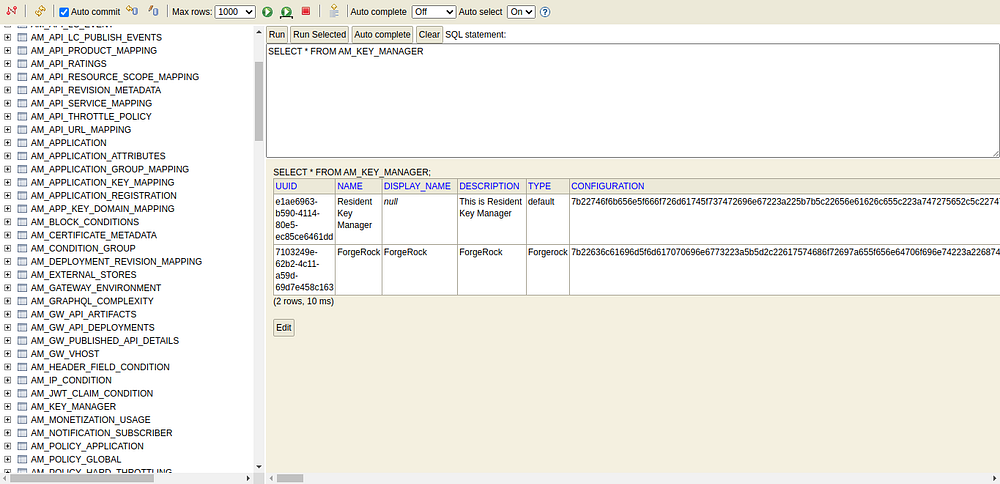
- According to the above result, the UUID of the ForgeRock key manager is, 7103249e-62b2-4c11-a59d-69d7e458c163
- Now let’s execute the below command to update the KEY_MANAGER column of the table record inside the AM_APPLICATION_KEY_MAPPING table.
UPDATE AM_APPLICATION_KEY_MAPPING SET KEY_MANAGER = 'KEY_MANAGER_UUID' WHERE CONSUMER_KEY = 'CLIENT_ID'Eg: UPDATE AM_APPLICATION_KEY_MAPPING SET KEY_MANAGER = '7103249e-62b2-4c11-a59d-69d7e458c163' WHERE CONSUMER_KEY = 'G6TEgGFbIuewWhhgJN0f9E7Bl7Qa'
Now we have done all the necessary actions to switch the OAuth 2.0 client from the Resident Key Manager to the ForgeRock Key Manager. 😇😇😇
Let’s test the behavior.
- Go to the dev portal.
- Select the TEST_APP application.
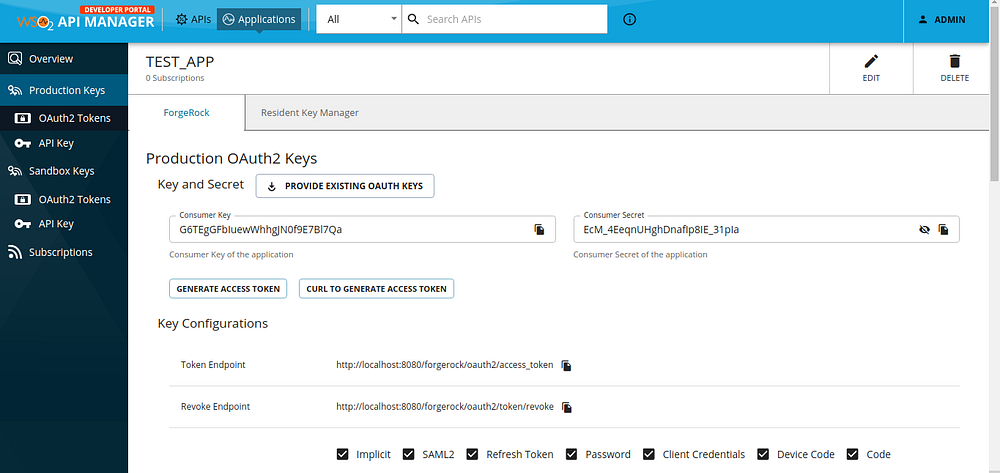
- When loading the application keys, we can see the old client ID and the client secret generated from the Resident Key Manager is now appearing in the ForgeRock Key Manager side.
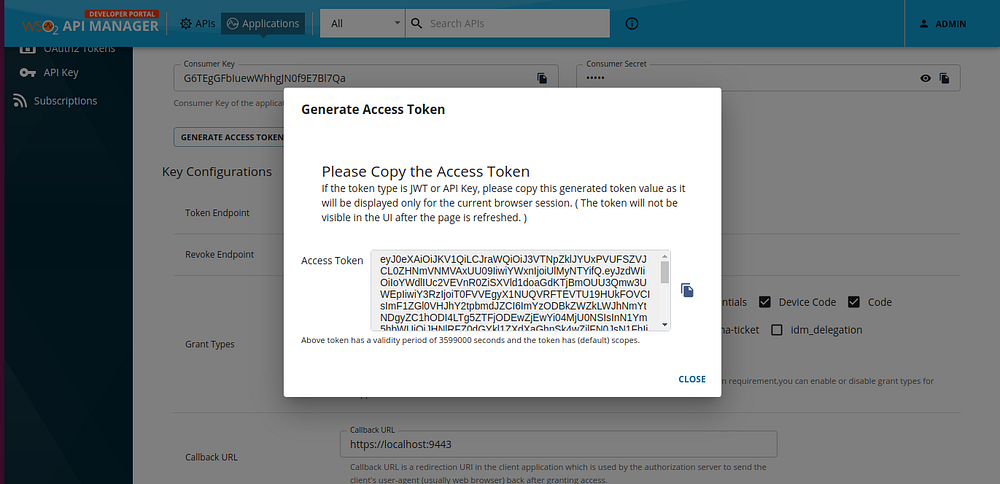
Let’s try to generate access tokens.
- Click on the GENERATE ACCESS TOKEN button and be able to see the below popup with the generated access token.
- When decoding the generated JWT, we were able to see the below information in the JWT payload. (We have used the website [6] to decode JWT tokens)
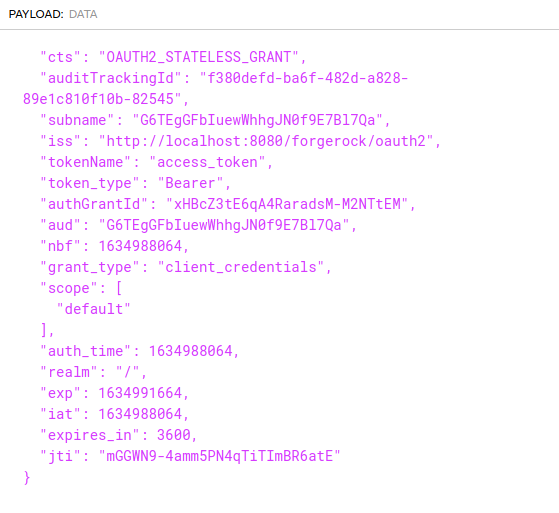
When checking the ISS (Issuer) of the token, we can see the oauth2 endpoint of the ForgeRock Key Manager. Hence, this JWT token has been generated from the ForgeRock end.
Our solution is working as expected. 😁😁😁
Congratulations!!! Now you have successfully switched the existing OAuth client of the application from the Resident Key Manager to the ForgeRock Key Manager by using the existing client credentials and without generating new client credentials. 😎😎😎
Happy Stacking!!! 😁😁😁
[1] https://updates.docs.wso2.com/en/latest/
[2] https://apim.docs.wso2.com/en/latest/administer/key-managers/configure-forgerock-connector/
[3] https://is.docs.wso2.com/en/latest/setup/browsing-the-h2-database
[4] https://string-functions.com/hex-string.aspx
[5] https://string-functions.com/string-hex.aspx
[6] https://jwt.io/